How to Rig a Bobber for Bluegill Fishing
There’s nothing quite like the sight of a bobber dancing on the water, then suddenly plunging below the surface – it's a timeless signal that a feisty bluegill has taken your bait! For many, especially those just starting out or teaching youngsters, bobber fishing for bluegill is the quintessential angling experience. But getting that bobber rig just right can sometimes feel a bit tricky, leaving you wondering if your setup is actually helping or hindering your chances. This guide is here to unravel all the mysteries of rigging a bobber for bluegill, ensuring you have the confidence to set up your line perfectly for a day of fun and fish.
Why Bluegill Fishing with a Bobber is a Kentucky Tradition
Bluegill fishing isn't just a casual pastime in Kentucky; it's a cherished tradition passed down through generations. These vibrant, eager-to-bite panfish offer an accessible and incredibly rewarding experience for anglers of all ages and skill levels. And when it comes to bluegill, a bobber rig is often the simplest and most effective way to entice them.
The Simple Joy of a Bobber Down
For many of us, the bobber is our first introduction to fishing. There's a primal excitement in watching that brightly colored float, hoping for a twitch, a dip, or that glorious moment when it completely disappears. It's visual, it's immediate, and it removes a lot of the guesswork that can come with other fishing techniques. You don't need to be an expert in feeling subtle bites through your rod tip or interpreting complex sonar readings. The bobber tells you exactly when a fish is interested, making it an ideal method for teaching kids how to fish and for enjoying a relaxed day by the water. The simple, undeniable thrill of a bobber going down is a core memory for countless Kentucky anglers, creating a lifelong connection to the sport.
What Makes Bluegill So Perfect for Bobber Rigs?
Bluegill are practically custom-made for bobber fishing, and it's not just because they're abundant in nearly every pond, lake, and slow-moving creek across Kentucky. These little sunfish are known for their opportunistic feeding habits and their tendency to school up in relatively shallow, cover-rich areas. They don't typically chase fast-moving lures far and wide; instead, they prefer to leisurely pick off small insects, worms, and other morsels.
A bobber rig presents your bait in a natural, suspended fashion, right at the bluegill's eye level. It keeps your bait off the bottom, preventing it from getting snagged in weeds or mud, and allows it to drift enticingly with subtle currents. Plus, bluegill have relatively small mouths, making small hooks and a delicate presentation crucial. A well-rigged bobber ensures your bait hangs perfectly, making it an easy target for these eager panfish. If you're looking for Kid-Friendly Fish to Catch in Kentucky, bluegill are absolutely at the top of the list, and a bobber rig is the perfect way to introduce them to fishing.
Decoding Bobber Types: Fixed vs. Slip for Bluegill Anglers
When you head to your local tackle shop or browse online, you'll notice there are a few different types of bobbers. While they all serve the same basic function – indicating a bite – understanding the differences between fixed and slip bobbers will significantly improve your bluegill fishing experience. Each has its place and its advantages, depending on the fishing situation.
The Fixed Bobber: Simplicity for Shallow Water
The fixed bobber, also known as a clip-on or spring bobber, is probably what most people picture when they think of a fishing bobber. These are the classic red and white floats that clip directly onto your fishing line at a set position. They come in various sizes and are incredibly easy to attach and use, making them perfect for beginners or quick setups.
The main advantage of a fixed bobber is its simplicity. You just pinch it open, secure your line, and you're ready to go. They're excellent for fishing in shallow water, typically depths of up to about 4-6 feet. Since the bobber is fixed in place, your bait will always hang at the same depth below it. However, this also means that if you're trying to fish deeper than your rod length, casting can become awkward. Imagine trying to cast a rig where the bobber is eight feet up your line, but your rod is only six feet long! It’s like trying to swing a baseball bat with a rope tied to it – not very efficient.
The Slip Bobber: Versatility for Deeper Depths
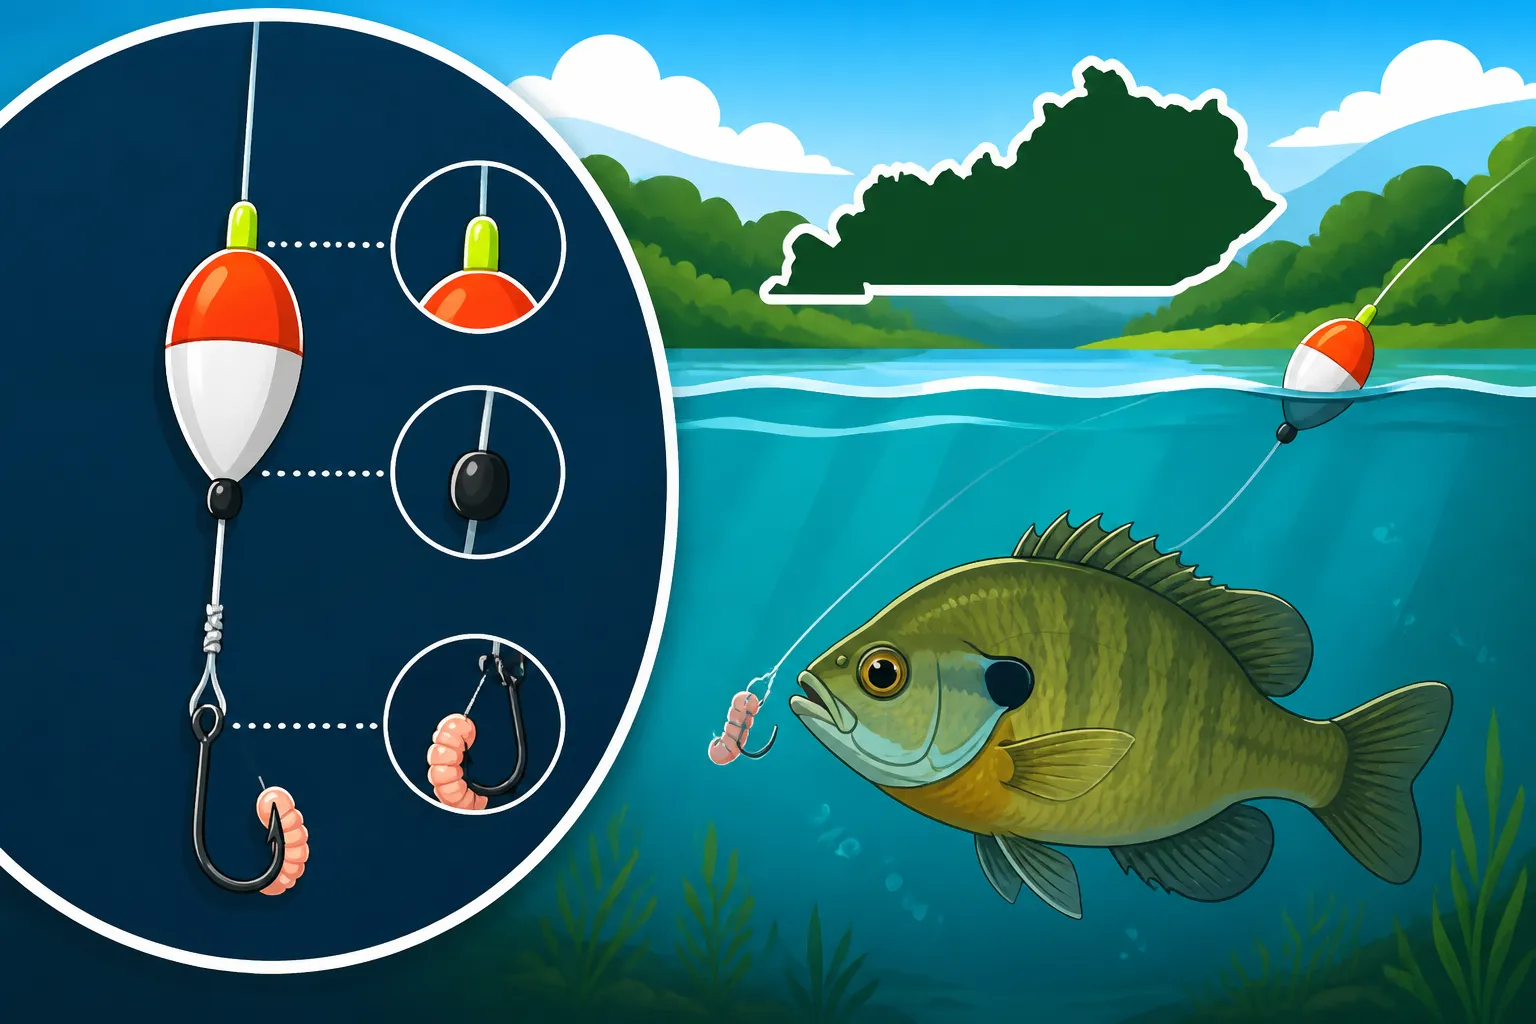
For those times when bluegill are holding in deeper water, or when you need to cast further, the slip bobber is your best friend. Unlike fixed bobbers, a slip bobber isn't clipped to the line; instead, your fishing line runs through a small hole or sleeve in the bobber itself. A tiny knot, called a bobber stop, is tied onto your main line above the bobber, which then slides freely up and down the line until it hits the bobber stop.
This design offers incredible versatility. You can set your bait to fish at virtually any depth, from a few feet to over 20 feet, simply by adjusting the position of your bobber stop. When you cast, the slip bobber slides down your line to rest against your terminal tackle (hook and weight), making for a compact and much more castable rig. Once it hits the water, the weight of your bait and sinker pulls the line through the bobber until it reaches the bobber stop, suspending your bait at the desired depth. This method is a game-changer for deeper lakes like Lake Cumberland or even when fishing deeper channels in a pond.
Choosing the Right Bobber Size and Sensitivity
Whether you opt for a fixed or slip bobber, size and sensitivity are key considerations for bluegill. You don't want a huge, clumsy bobber for these smaller fish.
- Size: Smaller bobbers are generally better for bluegill. A bobber that's too large will create more resistance, and a bluegill might feel it and drop the bait before you even get a chance to set the hook. Aim for bobbers that are only just large enough to keep your bait suspended, plus a small amount of weight. Think corkies or small foam floats, not the giant ones designed for catfish. You can often find a variety of small, sensitive bobbers on Amazon or at your local tackle store.
- Sensitivity: This refers to how easily the bobber shows a bite. Thinner, longer bobbers (like pencil floats or slender slip bobbers) are generally more sensitive than round, buoyant ones. They offer less resistance when a fish pulls on the bait, allowing you to detect even the most subtle nibbles. For bluegill, a sensitive bobber can mean the difference between missing a fish and landing it.
- Color: While not strictly about rigging, choose a color that's easy to see against the water, sky, and bank vegetation. Bright colors like fluorescent orange, yellow, or a classic red and white are popular for good reason.
Building Your Bluegill Bobber Rig: Essential Components
Now that we've covered the different types of bobbers, let's talk about the other crucial components you'll need to assemble a successful bluegill rig. Each piece plays an important role in getting your bait to the fish and bringing that fish to the bank.
The Right Rod, Reel, and Fishing Line for Panfish
You don't need heavy-duty gear to catch bluegill. In fact, lighter tackle makes the experience much more enjoyable and sporty.
- Rod: An ultralight or light-action spinning rod, typically 5 to 6.5 feet long, is ideal. The sensitive tip of an ultralight rod allows you to feel even the lightest bites and provides a satisfying bend when you're fighting a bluegill. A classic cane pole also works wonderfully for bank fishing, especially for new anglers learning How to Catch Bluegill With a Cane Pole. If you're looking for a good starting point, our guide on the Best Rod and Reel Combo for Beginners can offer some excellent suggestions.
- Reel: A small, lightweight spinning reel (size 1000 or 2000 series) that balances well with your ultralight rod is perfect. It should have a smooth drag system, which is important even for small fish, as it prevents line breakage when a bigger bluegill (or an unexpected bass!) decides to take your bait.
- Fishing Line: This is where many beginners go wrong by using line that's too heavy. For bluegill, 4 to 6-pound test monofilament or fluorocarbon line is more than sufficient. Lighter line is less visible to the fish, allows for better casting with light baits, and provides more sensitivity. Heavier line creates more resistance in the water, which can deter bluegill from biting. You can easily find these lighter lines from brands like Stren or Berkley on Amazon.
Hooks, Weights, and Swivels: The Small but Mighty Details
These tiny components are often overlooked but are absolutely critical for bluegill success.
- Hooks: Bluegill have small mouths, so you need small hooks. A size 8, 10, or even 12 Aberdeen or 'J' hook is perfect. Aberdeen hooks are thin-wired and tend to be easier to remove from a fish's mouth without causing harm, which is great for catch-and-release. Avoid hooks that are too large, as bluegill simply won't be able to get them in their mouths. A small wire snelled hook, which comes with a short leader already tied, can simplify the rigging process for beginners.
- Weights (Sinkers): Just enough weight to get your bait down and keep your bobber upright is all you need. Small split shot weights are perfect. They're easy to pinch onto your line and adjust. Start with one small split shot (size BB or 3/0) and add more if needed, ensuring your bobber floats mostly upright with only a small portion showing above the water. Too much weight will pull your bobber too far down or even sink it, while too little won't get your bait to the bluegill quickly enough.
- Swivels: While not strictly necessary for every bluegill rig, a small barrel swivel (size 10-12) can be helpful, especially if you're using live bait that tends to spin (like a wiggling worm). The swivel prevents line twist, which can weaken your line and cause tangles. If you're using a slip bobber and casting a fair distance, a swivel can also help separate your main line from your leader, providing a smoother casting experience.
Irresistible Baits to Present Under Your Bobber
Bluegill aren't picky eaters, which is another reason they're such a blast to catch. Here are some of the most effective baits to present under your bobber:
- Worms: Earthworms (nightcrawlers cut into smaller pieces, or red wigglers) are classic bluegill bait. They're natural, readily available, and bluegill absolutely love them. Just thread a small piece onto your hook, making sure to cover the hook point.
- Crickets & Grasshoppers: These live insects are fantastic, especially during warmer months. Bluegill can't resist a struggling cricket dangling in the water.
- Corn: Believe it or not, a few kernels of canned sweet corn on a small hook can be incredibly effective, especially in ponds where bluegill might be accustomed to being fed. It's clean, easy to use, and inexpensive.
- Maggots/Mealworms: Small, wiggling grubs like wax worms, mealworms, or red worms are irresistible to bluegill. They're durable and stay on the hook well.
- Small Artificial Baits: Tiny jigs (1/32 to 1/64 ounce) tipped with a small plastic grub or tube can also work well, especially if you give them a gentle twitch now and then. Sometimes, a tiny feather jig can be all you need.
- For more detailed insights on what to put on your hook, check out our guide on Best Bait for Bluegill in Kentucky Ponds.
Step-by-Step Guide to Rigging a Fixed Bobber
The fixed bobber rig is the easiest to set up, making it a perfect starting point for anyone new to fishing or teaching a child. Let's walk through the process together.
Attaching Your Fixed Bobber and Setting the Depth
This is where the magic starts to happen! You're almost ready to cast.
- Thread Your Line: First things first, make sure your rod and reel are properly spooled with 4-6 pound test line. If you're using a pre-rigged rod or a cane pole, simply unspool enough line to work with.
- Attach the Fixed Bobber: Take your fixed bobber. Most come with a small spring-loaded clip or a small plastic pin on one end.
- Spring-loaded clip: Press the top button or depress the spring mechanism to open the metal clip. Slide your fishing line into the opened clip and release the button/spring to secure the line.
- Plastic pin: Some bobbers have a small plastic pin that you push through a hole to secure the line. Thread your line through the hole, then push the pin through another slot to lock the line in place.
- Set Your Depth: This is crucial for getting your bait where the bluegill are feeding.
- Start Shallow: For bluegill, a good starting depth is usually 1 to 3 feet below the bobber. Bluegill often cruise relatively shallow areas, especially around submerged cover like weed beds, brush piles, or docks. If you're fishing a pond that's only 4-6 feet deep, setting your bait too deep means it'll be dragging on the bottom.
- Adjusting the Depth: To adjust the depth, simply slide the bobber up or down your main line. Move it further from the hook for deeper presentations, and closer to the hook for shallower presentations.
- Observation is Key: Pay attention to your surroundings. Are there visible weed beds? Is the water cloudy or clear? Are bluegill jumping or making ripples on the surface? These clues can help you decide on an initial depth. If you're not getting bites after 15-20 minutes, try adjusting the depth by a foot or so until you find the fish.
Securing Your Hook and Adding the Perfect Amount of Weight
With your bobber in place, it’s time to complete the business end of your rig.
- Tie on Your Hook:
- Choose a Simple Knot: For beginners, a simple improved clinch knot or a Palomar knot are excellent choices. They are strong and relatively easy to tie. If you need a refresher, there are tons of great tutorials online, and a quick search for "how to tie an improved clinch knot" will yield visual step-by-step guides. For smaller hooks, sometimes a simple fisherman's knot is enough.
- Secure the Hook: Pass the end of your fishing line through the eye of your small hook. Then tie your chosen knot firmly. Trim any excess line from the tag end, leaving about 1/8 to 1/4 inch.
- Add Split Shot Weight:
- Placement: Pinch one or two small split shot weights onto your line, about 6 to 12 inches above your hook. The exact distance isn't critical, but you want it far enough from the hook that it doesn't interfere with the bait's natural presentation.
- Amount of Weight: Start with just one small split shot (size BB or 3/0). You want just enough weight to allow your bait to sink naturally and to keep your bobber upright. When your bait is in the water, the bobber should stand mostly vertical, with only the top colored portion visible. If it lies flat on the water, you need more weight. If it's pulled too far down, you have too much weight. The goal is a sensitive setup that shows even light bites.
- Why Not Too Much? Too much weight will make your bobber less sensitive to light bites, and a bluegill might drop the bait because it feels unnatural resistance. You want the bobber to dip or move easily.
Mastering the Slip Bobber Rig for Bluegill Success
Once you're comfortable with fixed bobbers, graduating to a slip bobber opens up a whole new world of versatility, allowing you to target bluegill in deeper waters without the awkward casting.
The Crucial Bobber Stop and Bead Assembly
The bobber stop is the unsung hero of the slip bobber rig. It's a small but mighty component that allows you to control your fishing depth.
- Attach the Bobber Stop:
- Thread the Loop: Most bobber stops come on a small plastic sleeve with a loop of line. Pass your main fishing line through this loop.
- Slide the Stop: Carefully slide the bobber stop off the plastic sleeve and onto your main line. You'll often see these for sale on Amazon or at any reputable tackle dealer.
- Snug it Down: Gently pull on both ends of your main line to snug the bobber stop knot down. Don't pull too hard, as you want it tight enough to hold its position but loose enough that you can still slide it to adjust your depth later.
- Add the Small Bead:
- Importance: Immediately after the bobber stop, slide a small plastic or glass bead onto your main line. This bead is absolutely essential!
- Purpose: The hole in your slip bobber is usually larger than the bobber stop knot. The bead acts as a buffer, preventing the bobber from sliding over the bobber stop knot. Without the bead, your slip bobber would just keep sliding all the way down to your hook, defeating the purpose of the stop. Make sure the bead is larger than the hole in your bobber.
Threading Your Slip Bobber and Adding Terminal Tackle
Now that your bobber stop and bead are on, it’s time to add the bobber itself and your other terminal tackle.
- Thread the Slip Bobber:
- Direction: Your slip bobber will have a small hole or eyelet at both the top and bottom. Thread your main line through the top eyelet, down through the body of the bobber, and out the bottom eyelet.
- Check Orientation: Ensure the bobber is facing the correct direction. Usually, the more tapered or pointed end is the top, where the bobber stop will rest.
- Add the Weight:
- Sinker First: For a slip bobber rig, it's often best to put your main weight below the bobber, rather than just small split shot near the hook. This main weight helps pull your line through the bobber until it hits the stop. A single small bullet sinker or egg sinker (1/8 to 1/4 ounce) is often suitable, especially if bluegill are deeper.
- Split Shot Option: You can also use a few larger split shot weights grouped together if you prefer.
- Attach a Swivel (Optional but Recommended):
- Tie It On: Tie a small barrel swivel (size 10-12) to the end of your main line, just below your main weight. Use an improved clinch or Palomar knot.
- Leader: From the other end of the swivel, tie on a short leader of fishing line, typically 12 to 18 inches long, using the same pound test as your main line or slightly lighter. This leader is what your hook will be tied to.
- Benefits: The swivel prevents line twist and can act as a stop for your main weight if you're using a free-sliding sinker. The leader also makes it easier to change hooks or repair snags without re-rigging your entire setup.
- Tie on Your Hook:
- Leader Connection: Tie your small bluegill hook (size 8, 10, or 12) to the end of your leader. Again, an improved clinch or Palomar knot works perfectly.
- Final Check: Ensure all knots are tight and secure, and trim any excess tag ends.
Adjusting Your Depth for That Sweet Spot
With a slip bobber, adjusting your depth is incredibly easy and precise.
- Slide the Bobber Stop: To change your fishing depth, simply slide the bobber stop knot up or down your main line.
- Deeper Water: Slide the stop further away from your hook (closer to your rod tip) to fish deeper.
- Shallower Water: Slide the stop closer to your hook to fish shallower.
- Test and Observe:
- Initial Guess: Just like with fixed bobbers, start with an educated guess based on the water depth and where you think bluegill might be holding (around cover, structure, or drop-offs).
- Fine-Tuning: Cast your rig out and let it settle. If your bobber is lying flat or not standing upright, you might be too deep and your bait is on the bottom. If you're not getting bites, try moving the bobber stop up or down in 1-foot increments until you start getting some action. This is especially important when you're exploring Best Ponds for Bluegill Fishing in Kentucky and might not know the exact depth.
Tips for Maximizing Your Bluegill Catch with a Bobber
Rigging your bobber correctly is a huge step, but a few extra tips can turn a good day of fishing into a fantastic one! Bluegill are generally forgiving, but these pointers will help you consistently find and catch them.
Reading the Water and Presenting Your Bait
Bluegill might be abundant, but they're not everywhere all the time. Learning to read the water helps you put your bait where they live.
- Look for Cover and Structure: Bluegill love cover. Think submerged logs, fallen trees, weed beds, lily pads, docks, or even shaded areas under overhanging trees. These spots offer protection from predators and ambush points for food. Our article on How to Find Bluegill Beds in Spring offers even more specific advice on locating these hotspots.
- Observe the Water Surface: Keep an eye out for subtle signs of fish activity – ripples, swirls, or even bluegill jumping to catch insects. These are indicators that fish are present and actively feeding.
- Depth is Key: As mentioned, bluegill often hold at specific depths. If you're not getting bites, systematically change your depth by moving your bobber stop a foot at a time. Sometimes, being just 6 inches off can make all the difference. Don't be afraid to experiment!
- Subtle Presentation: Once your bait is in the water, resist the urge to constantly reel it in or move it too much. Bluegill are often attracted to a stationary or slowly drifting bait. Let the natural currents do some of the work. If you need to impart action, a very gentle twitch of your rod tip every 30 seconds or so can sometimes entice a hesitant fish.
- Patience, Then Action: Give your bait time. Bluegill often circle a new presentation before committing. If after 5-10 minutes you've had no action, consider a gentle retrieve and recast, or adjust your depth or location.
Common Bobber Rigging Mistakes to Avoid
Even seasoned anglers sometimes fall into these traps. Being aware of them will give you an edge.
- Using Too Large of a Bobber: This is probably the most common mistake. A bobber that's too big creates excessive resistance, and a bluegill will feel it and spit out the bait before you can react. Use the smallest bobber that will effectively float your bait and weight. You want minimal resistance.
- Too Heavy Fishing Line: As discussed, anything over 6-pound test monofilament is likely overkill and will reduce your bites. Lighter line is stealthier and more sensitive.
- Too Large of a Hook: Bluegill have tiny mouths. A hook that's too big means they can't get it in their mouths, or they'll just peck at the bait around it. Stick to size 8, 10, or 12 hooks.
- Too Much Weight: Just like a too-large bobber, too much split shot makes the rig less sensitive and less natural. It can also cause your bait to sink too quickly past the bluegill's feeding zone. Use only enough weight to get your bait down and keep your bobber upright.
- Not Changing Depth or Location: Don't get stuck in a rut. If the fish aren't biting in one spot or at one depth, they're probably somewhere else. Bluegill move! Be willing to try a slightly different cast, move a few feet down the bank (especially useful for Bank Fishing Techniques for Beginners), or adjust your depth. The beauty of a bobber rig is how easy it is to make these adjustments. Our guide on Simple Bank Fishing Tips for New Anglers has more great advice for those fishing from shore.
- Ignoring the Bait: Make sure your bait is fresh and lively (if using live bait) and that it's properly threaded on the hook. Old, shriveled worms or bait that's falling off the hook won't attract much attention.
Following these tips and understanding the nuances of fixed and slip bobber rigs will set you up for many successful bluegill fishing adventures in Kentucky!
| Feature | Fixed Bobber | Slip Bobber |
|---|---|---|
| Ease of Setup | Very easy, clips directly onto the line | Slightly more involved (stop knot, bead) |
| Depth Control | Limited to rod length (bobber stays fixed) | Highly versatile, adjustable to any depth |
| Casting | Can be awkward for deep presentations | Smooth, compact casting for any depth |
| Sensitivity | Good, depends on bobber size | Excellent, especially with slender models |
| Best Use | Shallow water (up to ~6 ft), beginner-friendly | Deeper water, casting distance, versatile conditions |
| Snag Potential | Can snag if bobber is too far from hook | Less prone to snagging during casting/retrieving |
Disclaimer
This article is for general informational purposes only and does not constitute professional advice. Laws, prices and regulations vary by location and change over time. Consult a qualified professional for guidance on your specific situation.