How to Read a Fish Finder for Bass Fishing
There's nothing quite as frustrating as looking at your fish finder screen and feeling like you're staring at an abstract painting instead of an underwater world teeming with bass. Many anglers, even seasoned ones, find themselves scratching their heads, wondering how to translate those cryptic lines and blobs into actionable information that helps them catch more fish. This guide is designed to demystify your fish finder, helping you learn how to confidently read its display and use it as a powerful tool for bass fishing across Kentucky's incredible lakes and rivers.
The Core Principles: How Your Fish Finder Works Beneath the Surface
Before you can truly read your fish finder, it helps to understand a little bit about how it "sees" the underwater world. Think of it like this: your fish finder is a sophisticated echo sounder, sending out sound waves and listening for their return. It's much more than just a depth gauge; it's constantly mapping out the bottom, identifying objects, and even showing you fish.
The Magic of Sonar and the Transducer
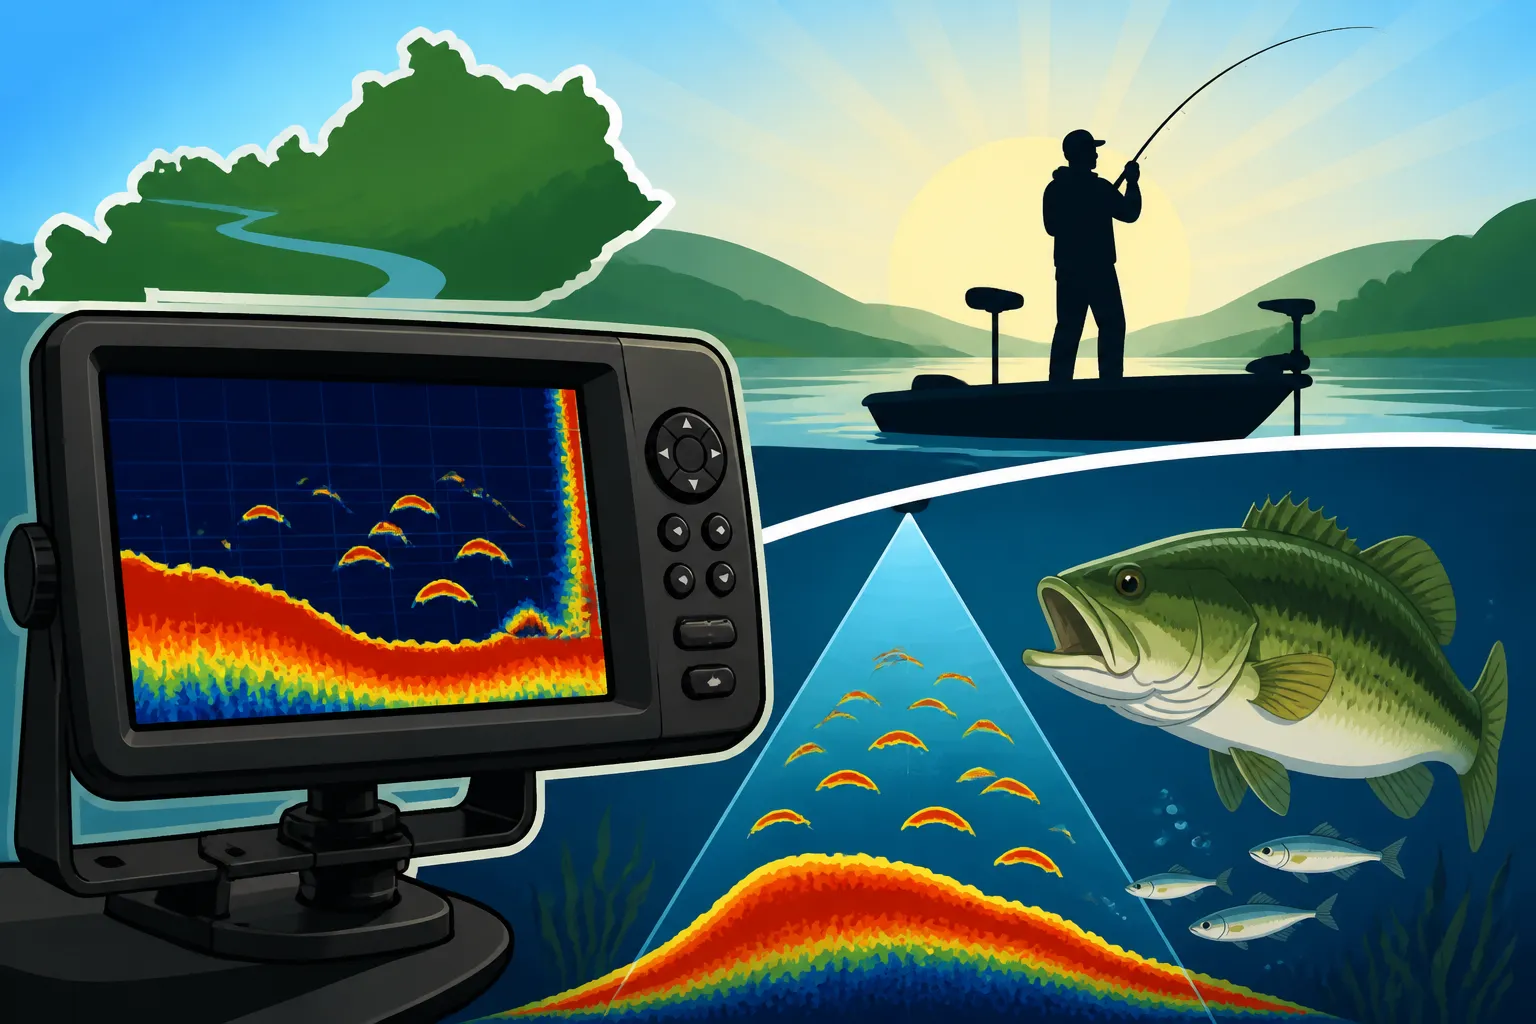
At the heart of every fish finder is its transducer. This little device, usually mounted on the transom or hull of your boat, is like the eyes and ears of your system. It sends out sound waves, or "pings," down into the water. When these sound waves hit something – whether it's the lake bottom, a submerged tree, or a fish – they bounce back to the transducer as echoes. Your fish finder then measures the time it takes for these echoes to return and uses that information to calculate the depth and location of whatever those sound waves encountered.
The screen then takes all this data and paints a picture in real-time. It’s important to remember that what you're seeing is a historical view, moving from right to left on the screen. The far-right edge is always what's happening right now beneath your boat. As your boat moves forward, new information scrolls in on the right, and older information moves off the left. Understanding this scrolling effect is crucial, because a fish mark you see at the center of your screen means that fish was directly under your boat a few moments ago, not right now.
Understanding Frequencies and Their Impact
Most fish finders operate on different frequencies, and knowing a little about them can really help you interpret what you're seeing. Lower frequencies, like 50 kHz, produce a wider cone angle and can penetrate deeper water. This is great for covering a large area, seeing deep structure, and finding fish in very deep water, like on Lake Cumberland. The downside is that the resolution isn't as sharp, so smaller details might be missed.
Higher frequencies, like 200 kHz, offer a narrower cone angle but provide much better detail and separation of targets. This is ideal for identifying individual fish, seeing fine details in brush piles, and fishing in shallower water, which is often where you'll find bass in places like Taylorsville Lake or Green River Lake. Some modern units even offer CHIRP sonar, which sweeps across a range of frequencies, giving you the best of both worlds with excellent target separation and depth penetration. Knowing which frequency your unit is using, or how to switch between them, can be a game-changer when you're trying to pinpoint those elusive bass.
Decoding the Display: What Those Arches and Lines Really Mean
Once you've got a grasp on the basic mechanics, the next step is learning to interpret the visual language of your fish finder screen. Those squiggly lines and blobs aren't random; they're telling you a story about what's directly beneath your boat.
Identifying Fish Arches and Bait Balls
This is often where the biggest "aha!" moment happens for new fish finder users. When a fish swims through the sonar cone, its curved body reflects the sound waves back to the transducer, creating that classic "arch" shape on your screen. The size and thickness of the arch can give you clues about the size of the fish. A thin, small arch might be a panfish, while a thick, distinct arch could very well be a trophy largemouth bass.
It's not always perfect, though. Sometimes you'll see half-arches or even just diagonal lines. This usually means the fish swam into or out of the cone quickly, or only grazed the edge of it. Don't dismiss these marks! They still indicate fish presence. What's even more exciting for bass anglers is spotting bait balls. These appear as dense clouds of small dots or a solid mass on the screen. Bass are often found lurking right on the edges of these bait balls, ready to strike. If you see a big arch or two near a bait ball, you've likely found a feeding zone, a prime location to drop your lure. Best Lures for Largemouth Bass on Big Water can give you some ideas for what to throw.
Interpreting Bottom Composition and Thermoclines
Your fish finder doesn't just show you fish; it also gives you invaluable information about the lake bottom. A hard bottom, like rock or gravel, will typically show up as a thick, bright line on your screen, often with a secondary echo just beneath it. This indicates a strong signal return. A soft bottom, like mud or silt, will appear as a thinner, less intense line without that distinct secondary echo. Bass often relate to harder bottoms, especially during spawning periods or when seeking out crayfish.
Another key feature to look for is the thermocline. In many Kentucky lakes, especially during the warmer months, you'll find a distinct layer in the water where the temperature changes rapidly. This often appears as a fuzzy, horizontal line on your fish finder screen. Bass and their forage fish often suspend right on top of, or just below, the thermocline because it offers optimal temperature and oxygen levels. Identifying this layer can drastically narrow down your search for active bass, especially when they're not relating directly to bottom structure.
Finding Bass Habitat: Interpreting Structure and Cover
This is arguably the most critical aspect of using a fish finder for bass fishing. Bass are creatures of habit and will almost always relate to some kind of structure or cover. Learning to identify these features on your screen is like having X-ray vision into their underwater world.
Reading Submerged Brush Piles and Timber
Brush piles and submerged timber are absolute magnets for bass. On your fish finder, these will appear as irregular, often chaotic clusters of signals rising from the bottom. The denser the brush, the more solid the return will look. You might see individual branches as distinct lines, or a whole pile might look like a fuzzy mound.
Often, you'll see fish arches directly within or just above these brush piles. This is a huge indicator that bass are actively using this cover. When you pinpoint a good brush pile, mark it as a waypoint on your unit immediately! This allows you to return to it with precision, casting your bait right into the strike zone. Many anglers even create their own brush piles, and knowing how to find them with your fish finder is key to successfully fishing these secret spots. Places like Bass Pro Shops or Amazon offer a variety of ways to store and organize your tackle so you can be ready for these brush pile encounters.
Identifying Rock Piles, Ledges, and Drop-offs
Rocks, ledges, and drop-offs are natural highways and ambush points for bass. On your 2D sonar, a rock pile will show up as a jagged, irregular bottom contour, often with strong, bright returns indicating the hard nature of the rock. Ledges and drop-offs will appear as sudden, dramatic changes in depth. You'll see the bottom line sharply drop off on your screen.
Bass often position themselves on the deeper side of a ledge, waiting for baitfish to swim over the shallower flat. They also love to hide in the nooks and crannies of rock piles. Pay close attention to the base of these features – that's often where the biggest bass will be lurking. Using your fish finder to track these depth changes and identify subtle humps or depressions on the bottom can reveal hidden gems where bass are holding. For instance, on Kentucky Lake or Lake Barkley, finding these underwater contours can make all the difference. Best Fish Finders for Kentucky Lake and Lake Barkley can help you choose the right unit for these challenging waters.
Side Imaging and Down Imaging for Enhanced Views
While 2D sonar is the classic "fish arch" view, many modern fish finders offer advanced technologies like Down Imaging and Side Imaging, which are incredibly powerful for bass fishing.
- Down Imaging provides a photographic-like view directly beneath your boat. Instead of arches, fish appear as distinct white blobs, and structure like trees and brush piles look much more realistic. It's excellent for confirming exactly what that 2D sonar blob actually is.
- Side Imaging is revolutionary. It scans out to the sides of your boat (sometimes 100 feet or more per side!) giving you an incredibly wide view of the underwater landscape. With Side Imaging, you can literally see entire brush piles, rock fields, and even individual fish lying on the bottom or suspending off to your left or right, without having to drive directly over them. This allows you to scout large areas quickly and identify prime targets before you ever drop a line, minimizing the chance of spooking fish. You can then mark these spots as waypoints and approach them carefully.
Learning to read these different sonar views simultaneously can give you an unparalleled understanding of the underwater world and greatly enhance your ability to find and catch bass.
Putting It All Together: Advanced Tactics for Bass Anglers
Reading your fish finder isn't just about identifying fish; it's about using that information to make smarter decisions on the water.
Utilizing Waypoints and Tracks for Precision Fishing
Once you've identified a promising piece of structure, a bait ball, or a lurking bass, the most important thing you can do is hit that "waypoint" button. A waypoint marks that exact spot, allowing you to return to it with pinpoint accuracy. This is invaluable when you're fishing a subtle humps on Lake Cumberland or a particular brush pile on Lake Barkley. Best Spots to Catch a Trophy Largemouth Bass often require this kind of precision.
Beyond individual waypoints, use your "track" feature. This leaves a breadcrumb trail of where your boat has been. By reviewing your track, you can see patterns in your movements, identify areas you've already covered, and systematically search new water. If you found bass at a certain depth or relating to a specific type of structure, your tracks can help you replicate that pattern elsewhere. This combination of waypoints and tracks transforms your fish finder from a passive viewer into an active navigation and fishing tool.
Adjusting Settings for Optimal Performance
Even the best fish finder won't perform optimally if its settings aren't dialed in for the conditions. Don't be afraid to experiment!
- Sensitivity/Gain: This controls how well your unit "hears" echoes. Too low, and you'll miss faint returns (like smaller fish or subtle structure). Too high, and your screen will be full of clutter and noise. Adjust it until you see a clear bottom line and distinct fish arches without too much interference.
- Contrast/Color Palette: Some units allow you to change the color scheme. Different colors can make it easier to distinguish between soft and hard bottom, or between fish and structure, depending on your preferences and the ambient light conditions.
- Scroll Speed: This controls how fast the image scrolls across the screen. A faster scroll speed provides more real-time information but can make arches look elongated. A slower speed compacts the image but can make it harder to react quickly to what's under the boat right now.
- Noise Rejection/Surface Clutter: These settings help filter out interference from the motor, prop, or surface turbulence. Use them carefully, as too much filtering can also remove legitimate fish signals.
Learning to fine-tune these settings for different depths, water clarity, and fishing styles is a skill that develops over time, but it's essential for getting the most out of your unit.
Practical Scenarios for Kentucky Bass Anglers
Let's imagine you're out on the water. You're approaching a familiar point on Lake Herrington.
- Scanning for Structure: As you idle towards the point, your Side Imaging (if you have it) might pick up a sunken tree off to the left that you never knew was there. You see distinct bass marks holding tight to the branches. You quickly mark a waypoint.
- Verifying with Down Imaging/2D Sonar: You switch to Down Imaging to get a clearer, more detailed look at the tree and confirm those fish are indeed solid targets. Your 2D sonar confirms active arches.
- Analyzing Bait: You notice a cloud of baitfish hovering near the tree. This tells you the bass are likely active and feeding.
- Assessing Bottom: The 2D sonar shows a hard bottom around the point, indicating rocks and gravel, another prime bass holding area.
- Making a Cast: Now, instead of just blind casting, you know exactly where to cast your How to Fish a Crankbait Around Cover or a jig, pitching it right to the edge of that submerged timber where the bass are waiting.
This systematic approach, driven by actively reading your fish finder, dramatically increases your chances of success compared to just hoping for a bite. Understanding your fish finder is a key component to successful bass fishing, especially during prime times like Kentucky Bass Fishing: The April-May Peak Season.
Common Challenges and Troubleshooting Tips
Even with the best fish finder, you're bound to run into issues. Knowing how to diagnose and address them can save you a lot of frustration on the water.
Dealing with a Cluttered Screen
A screen full of noise, interference, or random dots can be incredibly frustrating.
- Check Transducer Placement: Is it mounted correctly and free of obstructions? A transducer that's not fully submerged, or is in turbulent water, will give poor returns.
- Adjust Sensitivity: As mentioned before, too high sensitivity is a common culprit. Start low and gradually increase it.
- Reduce Frequency: If your unit has multiple frequencies, try a lower one, which is less susceptible to interference from surface clutter.
- Check Electrical Connections: Loose or corroded wires can cause interference. Ensure all connections are secure and clean.
- Engine Interference: Sometimes electrical noise from your boat's engine can affect the sonar. Try turning off your engine briefly to see if the clutter clears. If it does, you might need to investigate grounding issues or install a noise suppressor.
Remember, a little bit of clutter is normal, especially in busy waters or near strong currents. The goal is to minimize it so you can clearly distinguish actual fish and structure.
When You Don't See Any Fish
It happens to the best of us! You're on the water, you're scanning, and your screen is barren. Don't panic!
- Re-evaluate Your Location: Are you in known bass waters? Are you targeting areas with appropriate depth and cover for the current season and water temperature? Sometimes the problem isn't the fish finder, but where you're fishing. Consider checking out Best Fishing Spots in Kentucky.
- Check Your Settings: Is your sensitivity too low? Is your depth range set correctly? A unit set for 200 feet won't show you much detail in 10 feet of water.
- Change Frequencies: Experiment with different sonar frequencies to see if a wider or narrower cone angle helps.
- Look for Bait: Even if you don't see bass, finding baitfish is a strong indicator that game fish could be nearby, even if they're not directly under your boat at that moment.
- Trust Your Gut and Other Indicators: Your fish finder is a tool, not a magic wand. If you see birds diving, baitfish jumping, or other signs of life, don't ignore them just because your screen looks empty. Sometimes bass are tight to cover or spread out in ways that make them hard for the sonar to pick up directly.
Mastering your fish finder takes time and practice, but the rewards in terms of more successful and enjoyable bass fishing trips in Kentucky are absolutely worth the effort.
Disclaimer
This article is for general informational purposes only and does not constitute professional advice. Laws, prices and regulations vary by location and change over time. Consult a qualified professional for guidance on your specific situation.